 First, select the object you want to tune. Then move it to a location you desire. If it's the needles, you can use the "Rotate" tool to see if the pivot point is fine. Now make sure the object is selected and the X axis and Y axis are shown (see example on the left).
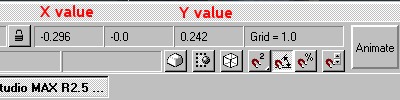
Now put you mouse where the both the X axis and Y axis meet. The numbers should be shown on the bottom of the screen (see example below). The first number is your X value and the third number is your Y value. Just copy the numbers (including the negative sign if shown) into the appropriate entry in the tuning file. You must leave the Z value in the tuning file at 0.003 in order for this to work properly.
Wasn't that easier than guess-and-checking the locations? I think I've saved at least an hour on every dash I've made with this little trick.